Sunday, January 8, 2012

Cloth Diapering is the Easy Part About Having a Baby

Get the chance to win 12 bumGenius All-in-Ones by leaving a comment below the post! Scroll to the end of the post for details.


If you did any kind of research before you had your baby, you probably decided long before your baby was born where the baby was going to sleep, what brand of car seat to buy, what outfit you and your baby would wear home from the hospital, and whether you were going to breastfeed or give your baby formula.

But when it came to diapering, were you overwhelmed? Do you remember all the choices that were available and how impossible it was to remember the difference between a pocket and prefold, all-in-one or all-in-two? If you ended up cloth diapering, now you probably spout out terms like that just as easily as you say slice of pizza or cup of coffee.

You were probably also overwhelmed by the thought of having a newborn in the days and weeks before your due date. What would you do all day with a helpless infant in your arms? Would you bond with the baby? Would the baby cry all the time? And now, looking back at those early days, you remember some challenges, but you wonder why you worried so much.

Change is overwhelming. It's hard to wrap your mind around a completely new experience like having a baby or cloth diapering. When you only have a few options to choose from (bed, crib, or cosleeper; breast milk or formula), it's easier to make a decision than when you have a multitude of options (prefold, pocket, cover, hook and loop, snaps, snappi, microfiber, organic, etc.)

So when it comes to cloth diapering, the thought of the unknown can make you shut down. When faced with a tough decision, it's easy to decide to do what's familiar.

Let me tell you, the process of cloth diapering is much easier than making a decision to cloth diaper. In other words, it's the decision that's hard. But putting on a cloth diaper, taking it off, and tossing it in the diaper pail--that's just as easy as using a disposable. By the time you've reached that point, the hard part is over.

So how do you get over the hurdle and decide whether cloth diapering is for you?
  • Get information from a good resource -There are thousands of cloth diaper resources out there. Forums where cloth diaper addicts (yes, once you start it's hard to stop) discuss everything from cute colors to stain removal can be helpful, but everyone has an opinion, and they may contradict one another, leaving you just as overwhelmed as you were when you started.

    Stop into Green Baby and ask Liz any question in the book--I can assure you she can help you out with any cloth diapering challenge you have!

    If you're looking for an online resource, my favorite is Cotton Babies. It's a little more streamlined. It has several different styles of diapers to choose from--just enough to give you a wide range of options when it comes to style and price, but it doesn't leave you feeling like a kid in a candy store. Cotton Babies also has a comprehensive How-To page where you can easily look up the answers to any question you may have.
  • Borrow a stash - Do you have friends who have used cloth diapers? Ask them if you can borrow some of their stash. Try out different styles and types of diapers. Get firsthand experience with them. Once you've seen how simple the process is, become addicted to the adorable prints and colors, and witnessed how cloth holds in poop explosions like nothing else, you'll be donating your disposables and starting your own stash. Because I started my own stash this way, now I've become a pro at using all kinds of cloth diapers. Give me a prefold and a snappi and I'm good to go, but I prefer to leave all-in-ones when I'm leaving my babies with Big T or a babysitter. I loved Fuzzi Bunz for the adjustable leg elastic when my newborn was having breastfed-blow-outs. I have a stash of one-size pocket diapers that I could quickly adjust to put on Baby T or snap to a smaller size when diapering Little M.
Once you've started cloth diapering, it's hard to go back to disposables. Many people start in an effort to help the environment and reduce their level of household waste. By the time their kids are out of diapers, though, they will likely tell you that they cloth diapered because it was cheaper and easier than disposables.
Look ma--no pants! (See how cute cloth diapers can be?)

Easier?
Yes! 
 I can't tell you the number of times I've had to change Little M's entire outfit because he leaked while wearing a disposable. In fact, that's one of the main reasons I started cloth diapering him so early. He hated getting his clothes changed, so blowouts were a miserable experience for both of us. When I go out, whether I'm traveling by airplane or just going to the store, I know I'm not going to have a mishap if I throw a cloth diaper on him. If I'm using disposables, I feel like I'm playing Russian roulette.

Cheaper?
Yes!
I still have to send the kids to daycare wearing disposables, so I have to buy a box periodically. I can't tell you how much I cringe when I have to pay money for disposables, knowing that I'm basically investing in crap--something I'm just going to throw away. If you wash your own diapers, you may spend extra money on your water bill, but you're saving money by avoiding weekly diaper runs. If you use a diaper service, you may be spending money weekly, but at least you're saving on the cost of buying disposables, gas, and laundering your baby's clothes every time there is a "pooplosion." And you have all the cute covers to sell when your baby has begun to use the potty. (Not to mention the tons--yes, literally tons--of diapers you are saving from ending up in a landfill over the course of your child's diaper "career.")

Still undecided? That's because change is hard. It's a new year. Take the plunge into cloth diapering. Once you try it, you'll be hooked. The hard part is making the decision. The easy part is doing the cloth diapering. Yes, there are some challenges. But isn't showering, doing laundry and vacuuming challenging once you have a newborn? Isn't washing every outfit that's on the receiving end of a disposable "pooplosion" challenging? Parenting has its fair share of challenges, yet we love it. Cloth diapering is much easier than parenting!
Little M wearing cute wool soakers


I received no compensation for this post, but I have entered it in a contest at http://jenniferlabit.com/2011/12/12/all-i-want-for-christmas-is-to-tell-the-world-about-cloth-diapers/. You can be a part of the contest, too! Leave a comment below this blog post telling me why you think cloth diapering is so much cheaper and easier than using disposables. If this post is chosen as the winner, one commenter will win 12 bumGenius one-size cloth diapers!

Monday, December 26, 2011

Wrapping Paper Christmas Tree Tutorial (12 Days of Green Christmas Crafts)

wrapping paper Christmas tree tutorial

Do you ever cringe at all of the wrapping paper you throw out on Christmas? One way to be a little greener next time you wrap a gift is to use your child's artwork, paper grocery bags, or dish towels and yarn to wrap presents.

But since we all pull out the gift wrap sometimes, how can we reuse it to make something cute? Go pull some out of your recycling bin and make this adorable wrapping paper Christmas tree to use as a decoration next year.

Gift bags, tissue paper, and wrapping paper from the presents we opened

Cut a block of styrofoam from one of the gifts you received (You can also stack up cardboard and tie it together).
wrapping paper Christmas tree tutorial

Stick a bamboo skewer (the kind you use to make shish kabob) into the foam block.
wrapping paper Christmas tree tutorial

Start cutting squares of gift wrap and thread it onto the skewer. Begin with small squares, and push them all the way to the end. You can put a few of the same size squares together, but slowly graduate them by cutting larger and larger squares and threading them on.
wrapping paper Christmas tree tutorial

Alternating between using tissue paper and gift wrap makes your tree fluffier. Once you have filled up about 2/3 of the length of the bamboo skewer, stick it into the foam block. Wrap some tissue paper around the block and secure it with ribbon. (I used the handle of one of the gift bags). Crumple some more tissue paper and add it to the top of the tree. Voila! This is a fun one for the kids, too!

Do you recycle your wrapping paper? Do you put them in the recycling bin or use them to create a fun craft? Share what you do in the comments below!

Check out some of the other 12 Days of Green Christmas Crafts:


December 14: 
Felt Owl Ornaments
December 15:
Burlap Ruffled Tree Skirt
December 16:
Easy Advent Calendars
December 17:
Quick Gift Tags from
Kids' Artwork
December 18:
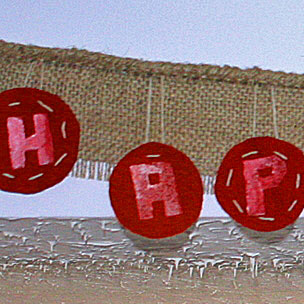
Homemade Holiday
Banner
December 19:
Torn Paper
Snowman
December 20:
Book Paper
Christmas Tree
December 21:
Tin Can
Luminaries

December 24:
A Sleigh and 8 Tiny
Reindeer


You can also find more cute crafts at:

Wednesday, December 21, 2011

Tin Can Luminaries (12 Days of Green Christmas Crafts)


I have to tell you a secret: I don't love doing crafts. I love the idea of doing crafts, but I wish I had an assistant to do the dirty work for me sometimes. Don't get me wrong--there are certain things I love to do, like work with fabric and paint. But when it comes to other media, I get less than excited.

But I was inspired by my DelMonte organic tomato cans. They are copper on the inside, and they are really pretty, so I decided to try my hand at some tin can luminaries. They sounded pretty easy: just tap some holes into a tin can with a nail.

Not so much, Martha Stewart.

First of all, this is what you'll need (empty food cans, a hammer, and a nail):

Then, all you need to do is hammer a design into the can with the nail. It's not as easy as you would think. You need about 5 hands. I tried it like this:

That didn't work. So I decided to put the can in my vise. The reason I hadn't done that yet is because this is what my vise looks like. Try to find it.

It was much easier to do in the vice. But since the can is flexible, I rested it on top of the vise or it would have fallen through every time I hammered it. I set the vise just narrower than the can. It didn't take long to quickly hammer out a star design.

Done!
The can on the left has a lot more holes, and it also has a real tea
light in it. The ones on the right have a battery-operated one,
which is not as bright.


Check out some of the other 12 Days of Green Christmas Crafts:

December 14: 
Felt Owl Ornaments
December 15:
Burlap Ruffled Tree Skirt
December 16:
Easy Advent Calendars
December 17:
Quick Gift Tags from
Kids' Artwork
December 18:
Homemade Holiday
Banner
December 19:
Torn Paper
Snowman
December 20:
Book Paper
Christmas Tree

Tuesday, December 20, 2011

Make a Paper Christmas Tree (12 Days of Green Christmas Crafts)


When Liz and I were working on our advent calendars the other day, Green Baby customer (and friend) Michele Reid gave us a great idea to make a paper Christmas tree from a book. Apparently this was all the rage in grade school. Liz and I must have missed the bus that day. But we thought it was such a cool idea, especially because we had made a book page pumpkin for Halloween, that we had to try it.

I had donated all my old books after my last yard sale, but I still was able to scrounge up one last book... the one I got for free at my OB's office when I was pregnant with Baby T.

Helpful Tip: Choose a book with fewer pages than this. I would say anything with more than 25 pages or so should work fine.

All you have to do is fold the pages. Open the book and fold down the first page. Crease it along the fold.


Fold the same page one more time as shown. Crease it.

Do this for every page in the book. (I'll admit, I cheated and doubled up on some pages to make it go quicker.) You'll end up with this.

Then you can paint it and add embellishments. Baby T painted ours green and glued on some pom poms.

Here, he was offering pom poms to Little M.

The end result (after a little extra painting on my part. I couldn't help it.)

Check out some of the other 12 Days of Green Christmas Crafts:

December 14: 
Felt Owl Ornaments
December 15:
Burlap Ruffled Tree Skirt
December 16:
Easy Advent Calendars
December 17:
Quick Gift Tags from
Kids' Artwork
December 18:
Homemade Holiday
Banner
December 19:
Torn Paper
Snowman

Monday, December 19, 2011

Torn Paper Snowman (12 Days of Green Christmas Crafts)


Today's project is festive and cute, but it's easy enough for kids to do. And it's eco-friendly, because you can use whatever paper you have lying around the house.

What you Need:

  • A sheet of paper for the background
  • a sheet of paper for the snowman
  • red and green paint
  • glue

Optional:

  • Scissors
  • Raisins for eyes
  • Macaroni for mouth
  • Sticks for arms

Instructions:

  1. Have your child paint the background with red and green paint. Go crazy. Have fun. Finger paint! Paint with your nose! Paint with your toes!
  2. After the paint is dry, draw 3 circles on the paper with a marker. 
  3. Give your child the other sheet of paper to cut up or tear up. 
  4. After all the pieces are torn up, show your child how to apply the glue (we used a glue stick) inside the circles you drew and stick the torn pieces of paper down.
  5. Decorate with eyes, mouth, and arms.

Tips:

You can tear up last year's Christmas cards for this project, or just use whatever paper you have lying around the house.

Go on a nature walk to find sticks for the arms. Maybe you'll find other natural items to decorate your picture.

Check out some of the other 12 Days of Green Christmas Crafts:


December 14: 
Felt Owl Ornaments
December 15:
Burlap Ruffled Tree Skirt
December 16:
Easy Advent Calendars
December 17:
Quick Gift Tags from
Kids' Artwork
December 18:
Homemade Holiday
Banner