Monday, December 26, 2011

Wrapping Paper Christmas Tree Tutorial (12 Days of Green Christmas Crafts)

wrapping paper Christmas tree tutorial

Do you ever cringe at all of the wrapping paper you throw out on Christmas? One way to be a little greener next time you wrap a gift is to use your child's artwork, paper grocery bags, or dish towels and yarn to wrap presents.

But since we all pull out the gift wrap sometimes, how can we reuse it to make something cute? Go pull some out of your recycling bin and make this adorable wrapping paper Christmas tree to use as a decoration next year.

Gift bags, tissue paper, and wrapping paper from the presents we opened

Cut a block of styrofoam from one of the gifts you received (You can also stack up cardboard and tie it together).
wrapping paper Christmas tree tutorial

Stick a bamboo skewer (the kind you use to make shish kabob) into the foam block.
wrapping paper Christmas tree tutorial

Start cutting squares of gift wrap and thread it onto the skewer. Begin with small squares, and push them all the way to the end. You can put a few of the same size squares together, but slowly graduate them by cutting larger and larger squares and threading them on.
wrapping paper Christmas tree tutorial

Alternating between using tissue paper and gift wrap makes your tree fluffier. Once you have filled up about 2/3 of the length of the bamboo skewer, stick it into the foam block. Wrap some tissue paper around the block and secure it with ribbon. (I used the handle of one of the gift bags). Crumple some more tissue paper and add it to the top of the tree. Voila! This is a fun one for the kids, too!

Do you recycle your wrapping paper? Do you put them in the recycling bin or use them to create a fun craft? Share what you do in the comments below!

Check out some of the other 12 Days of Green Christmas Crafts:


December 14: 
Felt Owl Ornaments
December 15:
Burlap Ruffled Tree Skirt
December 16:
Easy Advent Calendars
December 17:
Quick Gift Tags from
Kids' Artwork
December 18:
Homemade Holiday
Banner
December 19:
Torn Paper
Snowman
December 20:
Book Paper
Christmas Tree
December 21:
Tin Can
Luminaries

December 24:
A Sleigh and 8 Tiny
Reindeer


You can also find more cute crafts at:

Wednesday, December 21, 2011

Tin Can Luminaries (12 Days of Green Christmas Crafts)


I have to tell you a secret: I don't love doing crafts. I love the idea of doing crafts, but I wish I had an assistant to do the dirty work for me sometimes. Don't get me wrong--there are certain things I love to do, like work with fabric and paint. But when it comes to other media, I get less than excited.

But I was inspired by my DelMonte organic tomato cans. They are copper on the inside, and they are really pretty, so I decided to try my hand at some tin can luminaries. They sounded pretty easy: just tap some holes into a tin can with a nail.

Not so much, Martha Stewart.

First of all, this is what you'll need (empty food cans, a hammer, and a nail):

Then, all you need to do is hammer a design into the can with the nail. It's not as easy as you would think. You need about 5 hands. I tried it like this:

That didn't work. So I decided to put the can in my vise. The reason I hadn't done that yet is because this is what my vise looks like. Try to find it.

It was much easier to do in the vice. But since the can is flexible, I rested it on top of the vise or it would have fallen through every time I hammered it. I set the vise just narrower than the can. It didn't take long to quickly hammer out a star design.

Done!
The can on the left has a lot more holes, and it also has a real tea
light in it. The ones on the right have a battery-operated one,
which is not as bright.


Check out some of the other 12 Days of Green Christmas Crafts:

December 14: 
Felt Owl Ornaments
December 15:
Burlap Ruffled Tree Skirt
December 16:
Easy Advent Calendars
December 17:
Quick Gift Tags from
Kids' Artwork
December 18:
Homemade Holiday
Banner
December 19:
Torn Paper
Snowman
December 20:
Book Paper
Christmas Tree

Tuesday, December 20, 2011

Make a Paper Christmas Tree (12 Days of Green Christmas Crafts)


When Liz and I were working on our advent calendars the other day, Green Baby customer (and friend) Michele Reid gave us a great idea to make a paper Christmas tree from a book. Apparently this was all the rage in grade school. Liz and I must have missed the bus that day. But we thought it was such a cool idea, especially because we had made a book page pumpkin for Halloween, that we had to try it.

I had donated all my old books after my last yard sale, but I still was able to scrounge up one last book... the one I got for free at my OB's office when I was pregnant with Baby T.

Helpful Tip: Choose a book with fewer pages than this. I would say anything with more than 25 pages or so should work fine.

All you have to do is fold the pages. Open the book and fold down the first page. Crease it along the fold.


Fold the same page one more time as shown. Crease it.

Do this for every page in the book. (I'll admit, I cheated and doubled up on some pages to make it go quicker.) You'll end up with this.

Then you can paint it and add embellishments. Baby T painted ours green and glued on some pom poms.

Here, he was offering pom poms to Little M.

The end result (after a little extra painting on my part. I couldn't help it.)

Check out some of the other 12 Days of Green Christmas Crafts:

December 14: 
Felt Owl Ornaments
December 15:
Burlap Ruffled Tree Skirt
December 16:
Easy Advent Calendars
December 17:
Quick Gift Tags from
Kids' Artwork
December 18:
Homemade Holiday
Banner
December 19:
Torn Paper
Snowman

Monday, December 19, 2011

Torn Paper Snowman (12 Days of Green Christmas Crafts)


Today's project is festive and cute, but it's easy enough for kids to do. And it's eco-friendly, because you can use whatever paper you have lying around the house.

What you Need:

  • A sheet of paper for the background
  • a sheet of paper for the snowman
  • red and green paint
  • glue

Optional:

  • Scissors
  • Raisins for eyes
  • Macaroni for mouth
  • Sticks for arms

Instructions:

  1. Have your child paint the background with red and green paint. Go crazy. Have fun. Finger paint! Paint with your nose! Paint with your toes!
  2. After the paint is dry, draw 3 circles on the paper with a marker. 
  3. Give your child the other sheet of paper to cut up or tear up. 
  4. After all the pieces are torn up, show your child how to apply the glue (we used a glue stick) inside the circles you drew and stick the torn pieces of paper down.
  5. Decorate with eyes, mouth, and arms.

Tips:

You can tear up last year's Christmas cards for this project, or just use whatever paper you have lying around the house.

Go on a nature walk to find sticks for the arms. Maybe you'll find other natural items to decorate your picture.

Check out some of the other 12 Days of Green Christmas Crafts:


December 14: 
Felt Owl Ornaments
December 15:
Burlap Ruffled Tree Skirt
December 16:
Easy Advent Calendars
December 17:
Quick Gift Tags from
Kids' Artwork
December 18:
Homemade Holiday
Banner

Sunday, December 18, 2011

Homemade Holiday Banner (12 Days of Green Christmas Crafts)


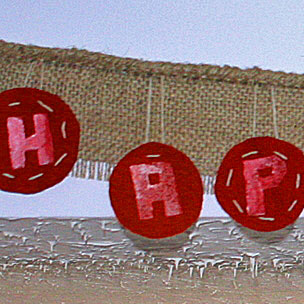
Next up on the crafty list is a holiday banner. Do you have one yet? This one was quick (and free) to make, and you can even get the kids involved. You can use any materials, but I chose to use burlap and a red wool blazer that I threw in the washing machine to felt up. Use whatever fabric you have lying around the house. Use funky patterns or mis-matched colors. This would be a great, green way to repurpose some ugly holiday sweaters.

You'll basically need fabric for the circles, fabric for the banner strip, yarn, paint, and potatoes. Yup, I said potatoes.


I cut the blazer into smallish circles (I traced around some ramekins from my kitchen to make a perfect circle, but I did it in 2 different days and used 2 different sizes by mistake. I preferred the way it turned out though, with the different-sized circles).

I also used 2 different blazers, and one was thicker than the other. For the circles made from the thinner fabric, I sewed them together with yarn and a big needle. Then I laid out the circles in the order I wanted them.
Now it was time to carve my potatoes into letters. (I did potato stamping to make the letters on my banner). To carve a potato, just cut it in half. You can draw on it with a pencil (it won't make marks, but it will leave indentations). Or you can just freehand it. I just freehanded it. If you have to cut out rectangular shapes, it helps to do it in pieces. Cut a triangle into the corners to get a clean cut.
You don't have to use a ton of potatoes to do this. I used two potatoes (four halves) to spell out "Happy Holidays." If you're cutting an "H," first cut it into an "A" shape and stamp it where you need to. Then, cut out the top of the A to make an "H". This can then become a "P" (if you add the little top part back in). Then, you can cut out all but the side of the "H" to make an "I."
An Important Potato Stamping Tip: If your letters are not symmetrical, you need to carve them backwards so they stamp in the right direction. (See my letter "P" below).
To do the stamping, apply paint to your potato stamper with a paintbrush, then stamp it onto your circles. A nice, heavy layer of paint works great on felt. I used washable tempera paint, but it came out faint. Acrylic would work better.
Now it's time to make the banner. Cut a length of fabric long enough for your letters to fit. (I had to sew two strips of burlap together.)
If you're using a fabric like burlap, you can intentionally fray the edges to give it a rustic look.

Now you're going to attach the circles to the background. Sew a length of yarn through the top of the circle, attach it to the background strip (it helps to have a big needle to do this), and tie the yarn off.

I had my circles dangle at different levels. That's it! I hammered it right into the wall with some nails. The banner says it all!

Check out some of the other 12 Days of Green Christmas Crafts:


December 14: 
Felt Owl Ornaments
December 15:
Burlap Ruffled Tree Skirt
December 16:
Easy Advent Calendars
December 17:
Quick Gift Tags from
Kids' Artwork